How to Make a Simple Plum Tart at Home
Table of Contents
Making a plum tart at home is easier than you think. With a few simple ingredients and some basic kitchen tools, you can create a delicious dessert. It’s perfect for any occasion.
Following a simple plum tart recipe will guide you through the process. You’ll learn how to make the crust, prepare the filling, and assemble the tart. This way, your tart will turn out perfectly.
Key Takeaways
- Learn how to make a simple plum tart crust from scratch.
- Discover the best way to prepare the plum filling.
- Understand how to assemble and bake the tart to perfection.
- Get tips on how to customize your plum tart with different toppings.
- Find out how to store and serve your homemade plum tart.
The Delightful World of Plum Tarts
Plum tarts are a treat worth exploring. They have a rich history and a delicious taste. Their flavor, versatility, and the joy of making them make them special.
History and Origins of the Classic Plum Tart
The classic plum tart comes from European baking, mainly France. It’s called “Tarte aux Prunes.” Fruit tarts were common in European bakeries from the Middle Ages.
Over time, the recipe changed. It now uses different plums and pastry methods.
Why Homemade Plum Tarts Outshine Store-Bought Versions
Homemade plum tarts are fresher and more personal than store-bought ones. You can pick the best ingredients for a better taste. Baking your own tart is rewarding, letting you make it just how you like it.
With top-quality plums and a homemade crust, your French plum tart recipe will be amazing. Sharing a homemade tart with loved ones makes it even more special.
Essential Ingredients for the Perfect Plum Tart
Making a plum tart that tastes great and looks good starts with the right ingredients. For a simple plum tart recipe to succeed, pick the best plums and mix them with pantry staples.
Selecting the Best Plums for Your Tart
The plum type you choose affects your tart’s taste and texture. Make sure to pick plums that are in season and ripe.
Seasonal Varieties to Consider
Go for plums like Santa Rosa or Italian Prune. They’re sweet and tart, perfect for your tart.
Ripeness Indicators
Look for plums that are soft to the touch and smell sweet. This means they’re ripe and ready to use.
Pantry Staples You’ll Need
You’ll also need flour, sugar, and butter for the crust and filling. These are key for a recipe for plum dessert that’s easy and tasty.
Optional Ingredients for Flavor Enhancements
Adding almond extract or cinnamon can make your tart special. These extras can give your tart a unique flavor.
Kitchen Tools and Equipment Required
Before you start baking your plum tart, it’s important to have the right tools. This makes sure your baking goes smoothly and your tart looks great.
Must-Have Baking Tools
You’ll need some key baking tools to start. A large mixing bowl is needed for making your dough. A pastry blender or food processor helps mix your ingredients. And a rolling pin is used to roll out your pastry.
A 9-inch tart pan with a removable bottom is essential for a nice tart. You’ll also need a baking sheet to bake your tart.
- Large mixing bowl
- Pastry blender or food processor
- Rolling pin
- 9-inch tart pan with removable bottom
- Baking sheet
Nice-to-Have but Not Essential Equipment
Some tools are nice to have but not necessary. A pastry brush is useful for egg-washing your tart crust. This gives it a golden look. A silicone mat helps prevent your pastry from sticking when rolling it out.
You might also find a fruit peeler and corer helpful for preparing your plums. But these are not must-haves.
- Pastry brush
- Silicone mat
- Fruit peeler and corer
Preparing Your Workspace and Ingredients
To make baking smooth, get your workspace and ingredients ready. A clean and organized area reduces stress and makes baking fun.
Setting Up an Efficient Baking Station
Begin by clearing your countertops. Collect all tools and equipment for your simple plum tart recipe. You’ll need mixing bowls, measuring cups, a baking sheet, and a pastry brush. Make sure your oven is preheated and all ingredients are within reach.
- Clear countertops of unnecessary items.
- Gather all necessary baking tools and equipment.
- Preheat your oven to the required temperature.
Prepping Your Ingredients Ahead of Time
Prepping ingredients before mixing makes baking easier. For your recipe for plum dessert, wash and pit your plums. Measure out sugar and flour. Have your butter and eggs ready at room temperature.
- Wash and pit your plums, slicing them as required.
- Measure out dry ingredients like flour and sugar.
- Have your butter and eggs at room temperature.
Creating the Perfect Tart Crust
The foundation of a beautiful plum tart lies in its crust. A great tart crust is flaky, golden, and complements the filling without overpowering it.
Traditional Butter Pastry Method
The traditional butter pastry method is a time-tested approach. It combines cold butter with flour and other ingredients to create a flaky and tender pastry.
Measuring Ingredients Precisely
To start, it’s important to measure your ingredients precisely. This ensures your pastry has the right balance of ingredients, which is key to achieving a flaky texture.
Mixing Techniques for Tender Pastry
Mixing the dough requires a gentle touch. Use a pastry blender or your fingertips to work the butter into the flour until the mixture resembles coarse crumbs.
Resting the Dough
After mixing, let the dough rest. This allows the gluten to relax, making the dough easier to roll out and resulting in a tender crust.
Tips for Achieving a Flaky, Golden Crust
To achieve a flaky, golden crust, keep your ingredients cold. Handle the dough as little as possible. Brushing the crust with egg wash before baking can also enhance its color and texture.
| Ingredient | Quantity | Purpose |
|---|---|---|
| Cold Butter | 1 cup | Creates flaky layers |
| All-purpose Flour | 2 cups | Provides structure |
| Ice Water | 1/2 cup | Hydrates the dough |
Preparing Your Plums Like a Professional
The secret to a stunning tart plum is in how you prep your plums. The right prep boosts both looks and taste of your simple plum tart recipe.
Washing and Pitting Techniques
Start by washing your plums under cool water to get rid of dirt or wax. Dry them with a clean towel. To remove the pit, cut around the stem in a circle, then twist the halves apart. Take out the pit and slice or halve the plums as you like.
Slicing Methods for Beautiful Presentation
For a tart that looks great, slice your plums into even wedges. The slice thickness depends on your taste, but thinner slices are usually better. Arrange the slices in a way that cooks evenly and looks nice.
Pre-treating Plums to Enhance Flavor
Pre-treating your plums can really boost their flavor. You can use sugar maceration or add spices.
Sugar Maceration Process
Just toss your plum slices with a bit of sugar and let them sit for 15 minutes. This makes the juices come out and makes the flavor stronger.
Spice Additions
Adding a bit of cinnamon or nutmeg to your plum slices is a good idea. These spices bring out the plums’ natural sweetness and add a rich flavor to your tart plum.
| Pre-treatment Method | Effect on Flavor | Best Used With |
|---|---|---|
| Sugar Maceration | Enhances natural sweetness | Vanilla or caramel flavors |
| Spice Additions | Adds warmth and depth | Cinnamon, nutmeg, or cardamom |

The Simple Plum Tart Recipe: Step-by-Step Instructions
Making your plum tart starts with rolling out the pastry. First, lightly flour your workspace. This prevents the dough from sticking.
Rolling and Shaping Your Pastry
Roll out your dough to about 1/8 inch thick. This makes the crust delicate yet strong enough for the filling.
Rotate the dough as you roll it for even thickness. Then, place it in a tart pan with a removable bottom.
- Gently press the dough into the corners of the pan.
- Trim any excess dough from the edges.
- Chill the crust in the refrigerator for at least 15 minutes.
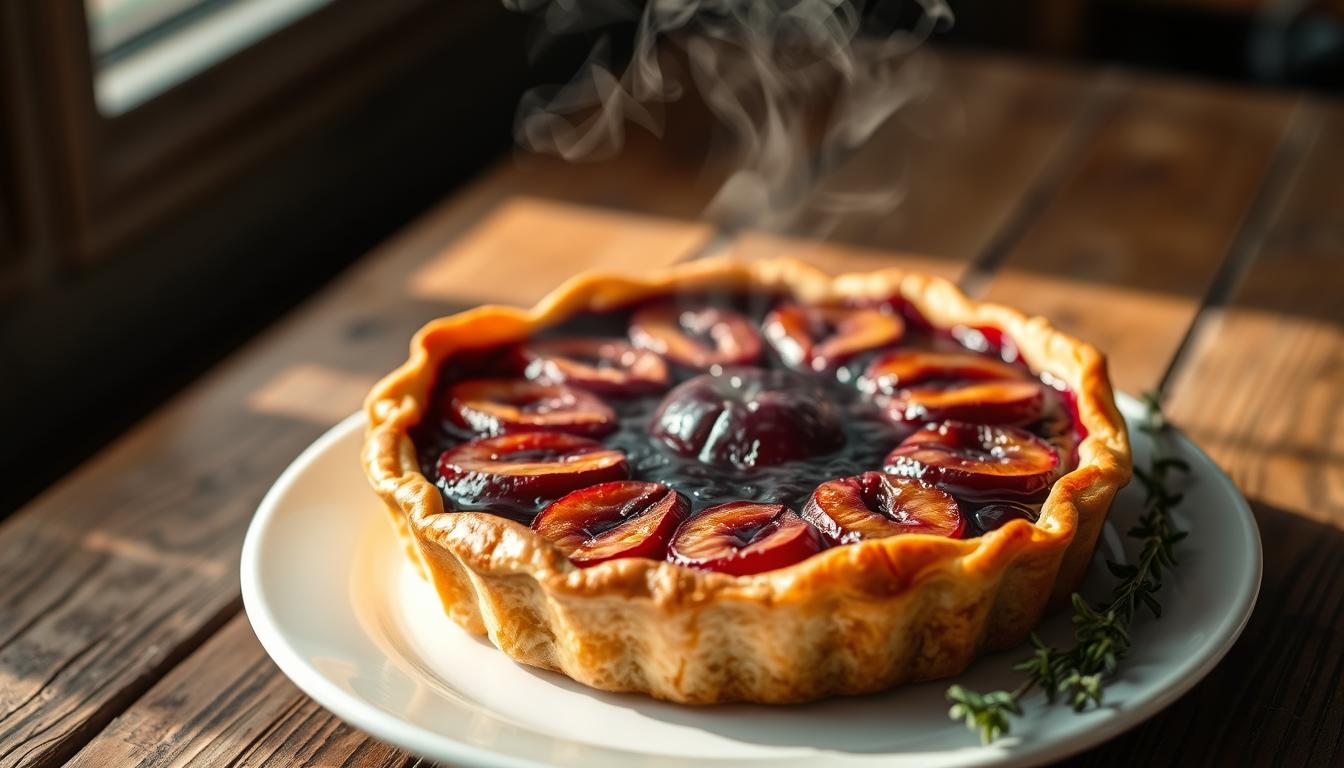
Arranging Plums for Maximum Visual Appeal
The way you arrange your plums affects your tart’s look. There are a few techniques to make it beautiful.
Circular Pattern Technique
Start with a plum in the center. Then, add more plums in a circle around it, moving outward.
Overlapping Method
For a rustic look, overlap your plum slices. This adds a layered effect that’s visually appealing.
- Begin by placing a layer of plums around the edge of the tart.
- Continue adding layers, working your way toward the center.
Adding the Perfect Amount of Sweetener
The sweetener amount depends on your plums’ sweetness and your taste. A light dusting of sugar is a good start.
You can also add honey or maple syrup for extra flavor.
Tips:
- Taste your plums before adding sweetener to determine their natural sweetness.
- Adjust the amount of sweetener according to your taste preferences.
Baking Your Plum Tart to Perfection
Now that your tart crust and plums are ready, it’s time to bake your simple plum tart recipe to perfection.
Optimal Oven Temperature and Positioning
Getting your oven to the right temperature is key. For a tart plum tart, 375°F (190°C) is perfect. Place your tart in the lower third of the oven for a crispy crust.
| Oven Temperature | Effect on Tart Crust |
|---|---|
| 350°F (175°C) | Crust may be slightly undercooked |
| 375°F (190°C) | Perfectly golden and crispy |
| 400°F (200°C) | Crust may be overcooked or burnt |
Visual Cues for Doneness
Watch your tart as it bakes. A tart plum tart should have a golden crust and soft plums. The crust should feel firm.
Cooling Properly for Best Results
After baking, let your simple plum tart recipe cool on a wire rack. This prevents the crust from getting soggy. Let it cool completely for the best taste and texture.
By following these steps, you’ll get a beautifully baked tart that will impress everyone.
Delicious Variations of the Classic Plum Tart
You can make the classic plum tart your own by trying new ingredients and styles. This dessert is great because it can be changed to fit many tastes and diets.
French-Style Plum Tart with Frangipane
A French-style plum tart adds frangipane, a mix of almonds, sugar, and eggs. This makes the tart taste rich and nutty, which pairs well with plums. Just spread frangipane on the pastry before adding the plums.
Rustic Galette-Style Plum Tart
Try a rustic and casual dessert with a galette-style plum tart. Fold the pastry edges over the plums for a charming, imperfect look. It’s a perfect dessert for family or casual parties.
Gluten-Free and Vegan Adaptations
Even with dietary restrictions, you can enjoy a gluten-free or vegan plum tart. Use gluten-free flour for a gluten-free tart. For vegan, replace eggs and dairy with flaxseed or almond milk. These changes let everyone enjoy the tart’s flavors.
| Variation | Description | Key Ingredients |
|---|---|---|
| French-Style | Rich frangipane filling | Almonds, sugar, eggs |
| Rustic Galette-Style | Casual, folded pastry | Plums, pastry dough |
| Gluten-Free/Vegan | Dietary adaptations | Gluten-free flour, vegan substitutes |

Serving Suggestions and Pairings
Make your plum tart stand out by pairing it with the right sides and drinks. A well-presented tart can be the star of any event, from a simple dinner to a big celebration.
Classic Accompaniments
Choosing the right sides can elevate your plum tart experience. Try it with a whipped cream dollop or a vanilla ice cream scoop. These creamy treats balance the tartness of the plums and add a rich feel to each bite.
Beverage Pairings that Complement Plum Flavors
Finding the perfect drink can really bring out the plum tart’s flavors. A cup of coffee or tea pairs well, perfect for breakfast or brunch. For a more decadent choice, pair it with a glass of dessert wine or a flavored liqueur that goes well with plums.
Presentation Ideas for Special Occasions
For big events, how you present your tart matters a lot. Top it with fresh mint leaves or powdered sugar for a stunning look. You can also add it to a dessert buffet with other treats and drinks.
Troubleshooting Common Plum Tart Problems
Making the perfect plum tart is more than just a recipe. It’s about solving common problems like soggy bottoms or overcooking. With the right techniques, these issues can be fixed easily.
Dealing with Soggy Bottoms
A soggy bottom is a common problem in plum tart making. It’s usually caused by too much moisture. To fix this, try blind baking your crust.
Blind Baking Techniques
Blind baking means baking your tart crust before adding the filling. It makes the crust crisp, preventing sogginess. To blind bake, line your crust with parchment paper, add pie weights, and bake at 375°F (190°C) for 15 minutes.
Moisture Control Methods
To stop soggy bottoms, control the plums’ moisture. Pat the sliced plums dry with paper towels before placing them on the crust. This step greatly reduces moisture.
Fixing Overcooked or Undercooked Tarts
Overcooking or undercooking can ruin a plum tart. Keep an eye on your tart while it bakes. If the crust browns too fast, cover the edges with foil to stop further browning.
Salvaging Less-Than-Perfect Results
Even with the best efforts, your plum tart might not be perfect. But don’t worry, you can fix it. For example, if it’s overcooked, serve it with ice cream to hide any dryness. As Julia Child said, “The only time to eat diet food is while you’re waiting for the steak to cook.” Use this idea to creatively serve your tart.
Conclusion: Enjoying Your Homemade Plum Tart Creation
Now that you’ve baked your plum tart, it’s time to enjoy it. The sweet and tangy flavors of your homemade plum dessert are perfect for any occasion. Try different variations, like French plum tart recipes, to make it unique.
When you take your first bite, you’ll love the flaky crust and tender plums. You made this masterpiece in your kitchen. You can serve it as is or add toppings to make it even better. Your homemade tart will impress anyone, whether it’s simple or French-inspired.
With this recipe, you’re not just baking a dessert. You’re making memories. So, enjoy your plum tart and share it with friends and family. It’s a great way to spread the joy of homemade baking.
FAQ
What is the best type of plum to use for a plum tart?
Sweet and firm plums like Santa Rosa or Italian Prune are best. They keep their shape when cooked.
Can I make a plum tart with other types of fruit?
Yes, you can try other fruits like peaches or apricots. Even berries can add new flavors.
How do I prevent the crust from becoming soggy?
Bake the crust well before adding filling. Use blind baking or moisture control to help.
What’s the difference between a French-style plum tart and a traditional plum tart?
French-style tarts have frangipane, an almond cream. It adds a rich, nutty taste.
Can I make a gluten-free or vegan plum tart?
Yes, use gluten-free flours for a gluten-free tart. Replace dairy with plant-based options for vegan.
How do I achieve a beautifully presented plum tart?
Arrange plums in a circle or overlap them. Add a decorative crust edge for a nice look.
What are some common mistakes to avoid when making a plum tart?
Avoid overworking dough and not pre-baking the crust. Also, control moisture to prevent a soggy tart.
Can I make a plum tart ahead of time?
Prepare crust and filling ahead. But assemble and bake just before serving for best taste and texture.